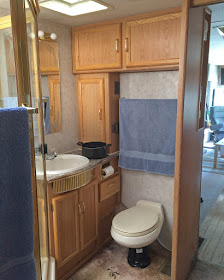
The bathroom was probably the biggest disaster we were dealing with and since the toilet was out and then replaced it was here we started with the renos. We decided to paint all our cabinets and this was where we started!
Here's the obligatory 'Before' shot of the old toilet, sink and cabinets;
All the cabinet and closet doors came off. Surfaces were thoroughly cleaned with a strong solution of TSP and then very lightly sanded, and then cleaned off again. The doors were part real wood (the framework around the outsides), and part dodgy wood-effect laminate type stuff (the centre of the doors). The cabinet bases were all the laminate. I say laminate - I think it's some sort of particle board that's been covered with a wood effect kind of paper. All I do know that when it's in contact with water over extended periods of time the board expands and the paper cover 'bursts' so we have a few lumps and bumps around from the water leakage issues we've had.

We bought Behr One-Coat latex paint in semi-gloss for the cabinets (Whisper White). The nice man at Home Depot convinced me I wouldn't need a primer with this paint. I was skeptical. And I had good reason. The cabinet base took 3-4 coats of paint (that was the fake wood stuff). It was tedious work I'm not gonna lie. All those nooks and crannies where you needed to use a paint brush. The top coat was done with a small foam roller which evened out the brush strokes and left a nice smooth finish to all the flat fronted areas. Same with the doors - we used a brush to get into the corners and edges of the doors and then the fronts were finished off with top coats using the roller. (The real wood edges generally needed less paint - just 3 coats).
 |
| Cabinet doors everywhere! We probably could've saved ourselves a bunch of time doing them in a more assembly line style but space was limited! |
I originally wanted all new hardware for the doors but I started realizing just how much work and money that was going to be. I opted for (near) instant gratification of spray painting. All the hinges, screws and door handles were soaked in the TSP solution, sanded if necessary and thoroughly dried. Some had a little rust on them but nothing too bad. I used the Rustoleum Satin Black spray paint and gave everything a couple of coats - if you look closely they aren't perfect but I'm not planning on spending a lot of time getting up close and personal with my closet door hinges...
 |
| Making progress - one coat paint was definitely not 1 coat!! More like 4 but we got there in the end! |
When the doors were off we realised we were liking the look of a couple of them without doors. Since we're not planning on driving around in Harvey all that much these days we figured that we'd leave them that way. In the bathroom we had a tiny shallow cupboard next to the sink which is now just open shelving and has given us the added bonus of having a usable counter top which we can put things on (Since before it had to be left clear to be able to open/close the cupboard door). We also liked the open shelving look under the sink. I considered hanging a little curtain there (all twee and cottage like) but in the end decided that some basket storage would look great. (if/when we're ever driving Harvey we'll figure out a plan for storing those items but 98% of the time he's parked up for months at a time so it's just not of concern to us right now.)
I was trying to find some baskets that worked for our space but it wasn't that easy. We had some pipework in the way on the top shelf so the baskets acted more as a cover-up than a functional storage box. In the end I decided to make some boxes myself that would custom fit in the space and around some pipework
We painted over the exisiting wallpaper. It was a smooth paper in great condition so after a quick wipe over with the TSP solution we painted with an Eggshell finish paint in a greige colour (Behr's 'Creme de la Creme'). It went on sooooooo nicely - we barely needed a second coat and it was a real pleasure job after all the cabinets!
The final update to the bathroom was the addition of some tiling around the sink area. Adding some tiling really jazzed things up and changed the look dramatically! I used the peel and stick
Stick-it Tiles'. I'm delighted with the look but not totally convinced on the application. I think they may have 'slipped' slightly since I put them on and the top edges are peeling back a little. They do suggest using glue which seems to defeat the idea of self adhesive tiles but I will try next.
All that's left is the flooring - which will hopefully happen sometime this fall (once we've installed a new roof and hopefully stopped any water leakage issues!!).

 After a little preamble by the master of ceremony, our local MP - Ron Cannon and a rep from the City of Kelowna we got down to business. All en masse reading the oath, singing Oh Canada (Chris and I had been practising the words for days!!) and then lining up to receive our certificates it was done!


